Sunday, September 6, 2009

Painted Top Wagon 7/8n2

KA-BAM! Wagon is out of the paint shop. On the sides, there are actually 6 layers of paint (I think I over-do it sometimes with the dry brushing). I'm debating on if I want to do the railroad initials on the side or not...


Weathering the Deck

Worked on some more minor things on the top wagon --

Stained and weathered the deck. I also put together some small tools that I think will go in it. I'll probably make some more I think... maybe a toolbox too?


You can see the difference between the natural wood and what I did to it.


I also started working on getting the axleboxes ready to mount. I'm filing off the casted nuts, and I'm going to be drilling them out and mounting them with real bolts/nuts.

Saturday, September 5, 2009

The wife had to go out this evening, so the FBRR shop kept the working into the evening. There's still a lot of work to be done, but thus far I'm feeling better about this car than the flatcar.

I spent a bit more time thinking about the chassis for this wagon, keeping the influence of the prototype. Most joints are both glued and nailed.


Ooops, some glue leakage....


Coming together! Here's the bed, with nails. The couplers are just hanging there at the moment.


And the wagon sides start coming up! The ruler on the left is a 7/8 scale ruler so you can get an idea of the dimensions. From the bottom of the wheels to the top of the sides, it's about 3.5ft. The side height is about 1.5ft. The wagon length is 8ft, and the width is 3.75ft.


A shot showing from a different angle. I decided to notch out where the wheel axleboxes were to give them a (hopefully) bit more rigidity in operation. Still haven't mounted them yet (trying to decide on what method to go with).

7/8n2 Top Wagon #1

The Foggy Bottom RR shop re-opened this morning and began construction of a new top wagon.


Wednesday, September 2, 2009

What's Happening Lately...

FLATCAR UPDATE
Few updates as of late because mostly I've been trying to figure out how to mount the wheels to the base of the flatcar. Originally I had planned to try to build the axleboxes/journals myself, however I decided instead to buy some pre-made ones to learn better about how they go together before attempting my own from scratch. I ended up purchasing 3 styles from Ozark Miniatures. Here are...

I like the look of these.


These are "sprung". They actually "bounce" up and down.


I also managed to score a (brand new) set of actual trucks on ebay, for about 75% off (shown here picture and kit pieces).


SHOP UPDATE
The other thing I've been working on is researching tools to expand my "shop" (i use that term loosely). After spending a while evaluating a table saw (a purchased I'd still like), I think instead a lathe would be more immediately helpful.

I've narrowed down my search to 3 lathes in particular:
  1. Taig Micro-Lathe II
  2. Unimat 3
  3. Sherline Lathe
I keep going back and forth, but I think I'm starting to lean towards the Taig for a number of reasons, along with it being the most affordable of the group.

Thursday, August 27, 2009

7/8n2 Garden Railway Video

Here's another find for a nice 7/8n2 outdoor line...

Wednesday, August 26, 2009

Flatcar Update

My milled wheels and casted couplers came in. I'm trying to figure out the axleboxes/journals now...

(the pieces are just free-sitting)

DSC02823

DSC02824

Ferrocarril Austral Fueguino 50cm Railway

Rob Bennett posted a couple links to a very nifty 50cm (19") gauge railway in Argentina [LINK] about the Ferrocarril Austral Fueguino (FCAF) "Prison Train". After doing some more googling I found some additional material on it, including a log of engine No.2 rebuild and a listing of engines and wagon/vans on the railway.

The best part? They have a 'mini' Garratt based on the Tasmanian K1.

Here are the links:


Monday, August 24, 2009

Australian Railways

Apparently Australia had quite a number of notable 2ft gauge railways. The good news is an organization named Australian Railway Historical Society (ARHS) seems to be dedicated to preserving what is left of them, and to publishing or making available books about the railways. Here are a few good ones I found (all 2ft gauge)...


Sunday, August 23, 2009

Inexpensive Live Steam 45mm

I found an interesting website this afternoon, the Basic Project Engine which includes plans to build a live steam locomotive for 45mm gauge out of more or less easily available pieces and without the requirement of machining tools (lathe or mill). I'm studying the plans to see if it can be fitted for R/C control, as this would make a nice beginner's project for a 7/8n2 logging locomotive.

Saturday, August 22, 2009

Building Small Steam Locomotives

Well while I'm waiting around for my SVE parts to come in, I ordered Building Small Steam Locomotives by Peter Jones. I've been eyeing it for over a month, and it was highly recommended by the guys at SE Lounge. The book covers how to build large scale locomotives that run on actual steam, including turning or milling your own parts. I'm defiantly looking forward to it.


On the table saw I mentioned earlier, I think I might shop the garage sale or craigslist market to find a good condition used one. Seems as though the price can easily get out of control for features that are nice, but that I probably don't need.

Thursday, August 20, 2009

Minor Flatcar Update

No progress on the flatcar in the past few days. I'm waiting on Sierra Valley Enterprises to ship me the wheels...

In the mean time I've been thinking about picking up a table saw. Home Depot has a Ryobi 10" for only $115, which isn't a bad deal at all. I'm trying to decide if a budget-line table saw will be 'good enough' for the use I'll put it through (I don't really need contractor grade tools as I'm not going to use it that much).

Sunday, August 16, 2009

Updates to the Flatcar

Been working on the flatcar some more.

I'm waiting on adding the wheels because, well, they're not here yet! I bought some 14" solid wheels from Sierra Valley Enterprises last week. I still haven't figured out the journals (the part that attaches the wheel bushing to the underframe).

In the mean time, I figured I would work on other aspects of the car. First mini-project: the brake wheel. Older railroad cars all had a manual brake on them. It was operated by turning a wheel on the top of the car, which forced the brake pads under the car to press against the wheels.

Brake Wheel


Brake Pad/Shoe on the Wheel:


So having said that, my mini-project was to scratch build the top part, the wheel, of the car brake. :D

I took 4 tries. Here are the first 3.
  1. First Attempt: Bottom center -- Soldered brass wire.
    Unsuccessful because: Unsturdy, fell apart, material length inadequate, oddly shaped
  2. Second Attempt: Top right -- Hand-filed styrene
    Unsuccessful because: a ton of work for something not that impressive. I didn't even bother to finish it because of the amount of work the ring took
  3. Third Attempt: Top left -- rubber O-ring with styrene rung insert
    Unsuccessful because: I couldn't figure out a way to "stiffen" up the outer O-ring. It's rubber and too flexible. That and paint wasn't sticking to it that well either.


So after all of that, I decided to give soldering another try. I should point out that I actually received the soldering iron as a birthday gift last month from my Mom and Stan. It's a Weller variable temp iron. It has the capacity to be turned up *really* hot and made soldering brass quite a bit more reasonable than the $8 piece of junk I'd been using (not to mention that it has quite a selection of tip sizes available for it).

Ah, so fourth attempt I'm finally happy with. Here's the brake wheel in it's raw brass and without the joints cleaned up:


And here's a closeup of it mounted on the flatcar. The joints have been filed down and it's been painted (a rusty silver/black finish).


Here's the progress on the whole flatcar so far:


And just for kicks and giggles I started working on a potential load for the flatcar. Here's a water tank that it might carry around. I say might because I may or may not use it for this flatcar. I might save it for something later on...

Saturday, August 15, 2009

Flatcar #1 Progress

Here's the progress on my 7/8n2 flatcar #1:


I built the underframe out of 3/8" basswood. The bolts in the frame are HO scale track nails.

Now on to figure out how to do the wheel journals and bearings....

Thursday, August 13, 2009

Making Distressed Wood from Popsicle Sticks

Here's my start-to-finish on how I'm making the distressed wood look:

I start by lopping off the rounded edges of the popsicle stick in my NWSL Chopper II (which is quite convenient for smaller strip material)


The end result is a tad over double the width of the gauge, which is right around the width I was going for anyways


I've seen a lot of people recommend using a wirebrush to distress the wood. This method is OK, but for my tastes the effect isn't enough. Instead I prefer to scratch it all myself. In this way I can control how deep the wood grain is, and if it's fresh from the lumber mill or a week away from being decommissioned. Since I'm still stuck in the On30 mindset of "everything modeled should be falling apart" I decided to go with rather deep grooves on my planks.

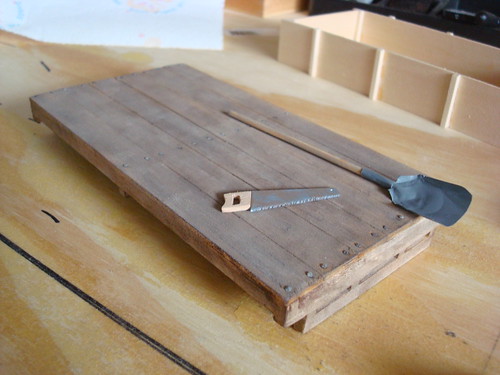
There are quite a few tools (pictured) that you can use to scratch the wood surface. What I found is that scribe-type tools for me tend to not work well. The gouge they make is fine (as intended) and thus tends to drag the saw dust from the scratch directly into the groove itself, producing a sort of "hairy" scratch line. Instead, I've found an Awl at a local hardware store that's a bit courser and my preferred tool (the one with the brown handle on the far left).


With awl in hand, I basically just start scratching out the wood grain lines. I found it's generally easier to start with lighter lines (less pressure on the awl) first, and then add deeper grooves after. After scraping for a bit, you'll end up with some fairly distinct lines, but other areas will be a bit bare. In the picture below you can see towards the middle right of the plank it's rather bare. After I've given the plank a rough over with the awl, I'll go back and try to find the bare spots like this and fill them in with light scratches.


Next I take some fine grit sand paper and pretty much just soften up all corners. I'm not methodical about this, and just try to go over all the corners at least once.


So the top of the plank should be looking good at this point. Next it's time to deal with the edges. For this I use an xacto knife with a #5 blade in it as seen, and for lack of better description, just randomly stab the end several times over.


Ok, a warning is needed for this next part. This is probably somewhat dangerous and there is probably a safer way to do what I'm going to describe. If you're going to try this yourself, please be cautious.

To get the gaps on the end of the board, I hold the board as seen firmly down against the workbench, and work the #5 blade back towards me into the board, then give it a gentle wiggle to make a small gap.

I've split a few sticks doing this, so gentle is a good word.


Up until now, on the ends, there shouldn't be that much material removed. Here's where the random stabbing comes into place. I take a smaller steel brush, and rub it against the end of the plank.


What I'm looking for is for small bits to be "blown out" by the brushing like this. I pick out the bits with tweezers.


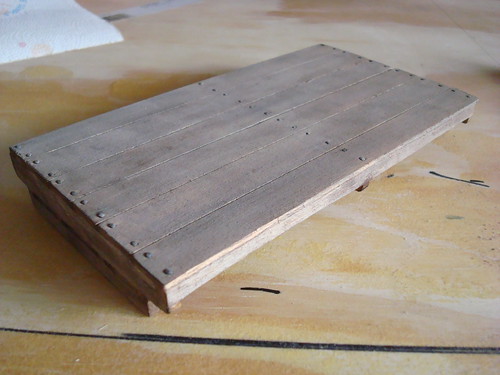
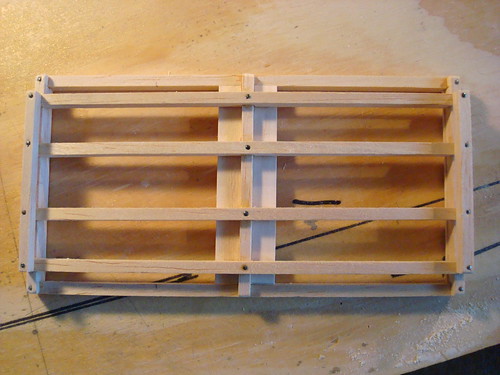
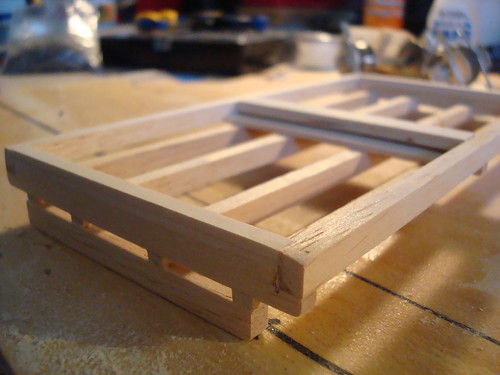
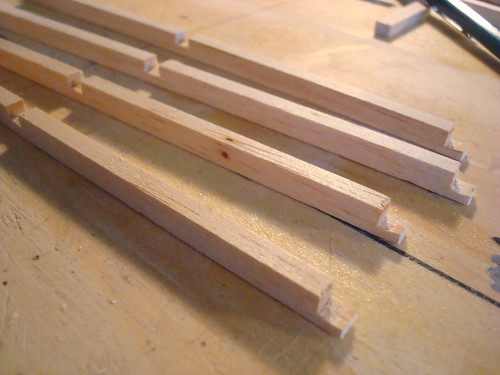
So here we are at the finished plank, ready for painting/staining:


If any of the photos are broken, here's the Flickr set for these pictures:
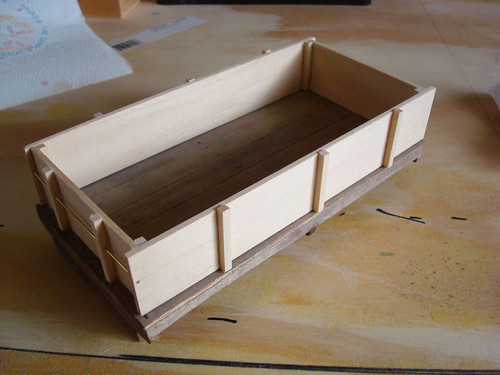
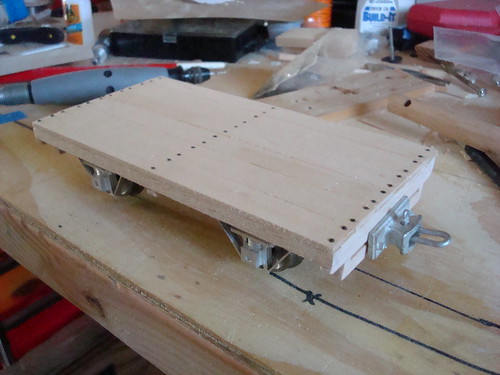
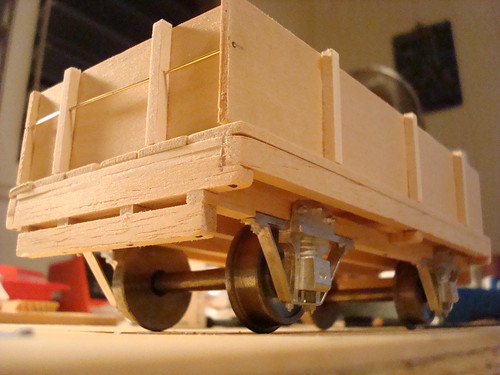
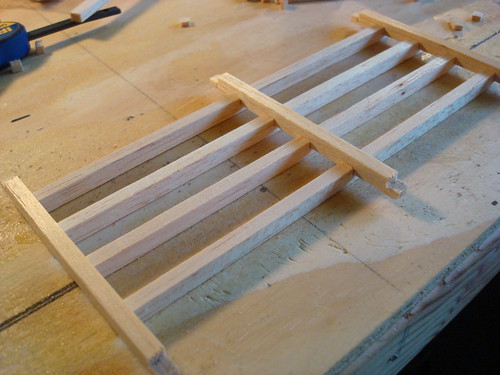
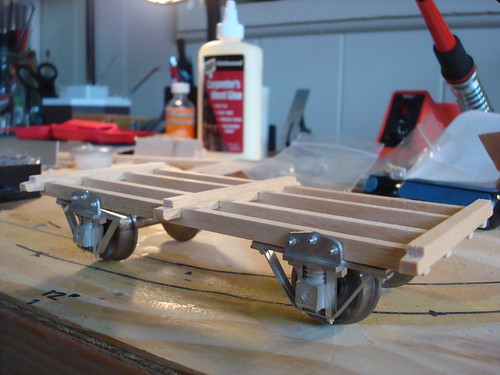
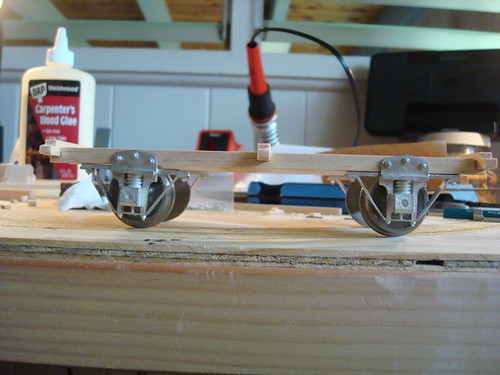
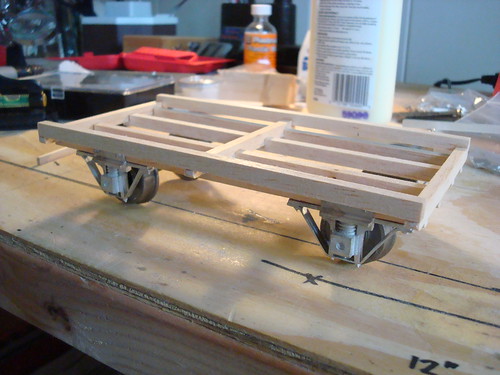
 Flatcar #1 7/8n2

Some more on 7/8n2

If you missed my explanation of what 7/8n2 was you can view that here.

Here are some more interesting 7/8n2 sights to see:

A 7/8n2 live steam (it runs off of actual steam) Decauville engine:


A neat and rather small outdoor 7/8n2 line:


This one is interesting because towards the end you see a G scale train roll by. Note the size difference (7/8n2 is much bigger):


This one is also live steam:

Wednesday, August 12, 2009

7/8n2 Scratchbuilt Flatcar

Well I decided to take a deviation from O scale to do a little side project in 7/8n2 scale. For those non-train readers an explanation is in order:

A way in which trains are classified is the width between the rails. It's known as the 'gauge'. In the United States, most trains people think of when they think of trains are Standard Gauge railroads. In standard gauge, the width between the rails is 4 ft 8.5 in. It's called Standard Gauge because, well, it's the standard.

Other gauges exist. In particular, anything skinnier than standard gauge is classified as "Narrow Gauge". Narrow gauge typically ranges from about 18" up to 36".

7/8n2 is a scale that is focused on 2 foot gauge; hence the "n2" part at the end. It stands for "narrow, 2 foot". 2 foot gauge railways (that is, 24 inches between the rails) were used throughout the world, but more notably in european countries and south africa. Narrow gauge trains were smaller in size. They hauled less cargo, but their advantage was they were cheaper to build and could negotiate tighter turns than standard gauge.

Most of the 2ft gauge railways there were in existance have gone, but some are still maintained. The most notable 2ft gauge in the US was found in Maine, and is the only 2ft gauge railway to haul general freight. The other railways were typically focused on industrial use, for example, hauling peat or slate from a mine to a processing facility.

So if "n2" means narrow 2 foot, what's the 7/8? It means the scale is 7/8 of an inch represents 1 foot in real life. It's a ratio of 1:13.7. Not that knowing that ratio makes it any clearer, but I'm just being specific here. 7/8n2 is a "oh my gosh that's huge" scale. Consider this: A 2 foot gauge boxcar that in real life was 10 feet long and 6 feet tall would be 8.75 inches long and 5.25 inches tall if modeled in real life. A 9 inch boxcar is pretty big, and, it reprents a rather small boxcar at that.

If that was all too complex, think of it this way: 7/8n2 is a large scale to model small trains.

So on to the flatcar. Understanding that, this scale is big.

I'm working on designing a 2 axle freelance flatcar (freelance means I'm making it up rather than modelling it after a real flatcar that existed in real life). I've only begun work on the deck so far, but here is what I have:


I also did some experiments with attempting to create nails to be sticking out of the board. This was my first (and not too impressive) attempt, but I think I've got the idea of the technique:


I should have mentioned, the deck planks in the pictures were made from popsicle sticks.

Monday, August 10, 2009

The Final Piece Arrives: Digitrax Zephyr DCC

Well the final piece of the railroad finally came in: The Digitrax Zephyr. So after wiring everything up, I gave it a test go. Here's a short clip of me messing around on some loose track...


And after a month of waiting, the verdict is.... not impressed. One of these two is over-hyped: DCC or On30. It just wasn't that interesting running a point-to-point ore delivery line with the diesel and DCC. The operation of the loco was a bit sporadic. I couldn't run it at anything below 2.5 speed (out of 5). When I first set it up, it worked fine, then about 10 minutes later stopped responding every other command. After completely re-wiring it, it began to work again, but would still sputter and hickup regularly. For the price it costs.... weak sauce. Maybe those guys doing R/C trains aren't so far off after all...

Sunday, August 9, 2009

7/8n18 Garden Tramline

Found a personal website for a 7/8n18 garden tramline this evening. Very neat little setup and trains.... (7/8n18 is the close cousin to 7/8n2. Both model in the scale of 7/8" to 1' using G gauge (#1) and O gauge track, respectively).

>>> Amalgamated Conserves Tramway

HO Unitrack Viaduct

I'm thinking over the idea of moving to Unitrack. If you missed that post it's here.

One of my reservations about moving over to Unitrack for a temporary layout is that I'm not too fond of the ideas of the trains running on the floor. This just seems like a bad idea all around. I'm particularly thinking of hair getting run up in the wheels, not to mention all the other dust and junk that it would pickup.

I had an idea on how to fix this.... a viaduct system that acts as a riser to bring the track off the carpet. Sure it's still technically on the floor, but at least now it's a distance off that things like hair and dust shouldn't be as big a deal. Plus it will probably look pretty cool and unique.

Viaduct Concept Without Track
Photobucket

Viaduct Concept With Track
Photobucket

As far as construction, I was thinking of 2 possibilities:

  • Make them out of wood
    This would probably be the easier and perhaps cheaper (I'll have to do the math), but certainly longer route. A jig could be created to line up all the parts, and then I could figure out a way to mass cut things, perhaps 3 at a time to speed up the process. It would be doable with the equipment I have, but would probably take a while.

  • Make them out of plastic (resin)
    I could instead make 1 master in wood, and then make a rubber mold off of that. I could then use that mold to mass produce the trusses. This has a couple advantages: (1) I could actually model the viaduct to look like a model bridge with detail and such (2) the supporting trusses would be all one piece of resin, not glued like the wood. I imagine this would give them more durability over time. A potential third positive is if they worked well I could perhaps sell them in sets on ebay. :D

Workarea

Ok, I got the workarea cleaned up and organized, and since it doesn't stay this way often I figured I should take a picture... (Mom and Stan if you're wondering where the work bench is, since it's foldable I used that for wood working outside, since I'm thinking Leilani doesn't want sawdust all over the house)

Photobucket

Photobucket